

How to Make a URL Shortener
In this article, we'll discover about How to Make a URL Shortener. Creating a URL shortener involves several steps, from understanding the basic concept to implementing the technical details. This article will guide you through a comprehensive, step-by-step process to build your own URL shortener.
1. Understanding URL Shorteners
URL shorteners transform long URLs into shorter, more manageable versions. This process is useful for a variety of reasons:
- Space-saving: Short URLs are easier to share, especially on platforms with character limits, like Twitter.
- Aesthetics: Short URLs look cleaner and are more user-friendly.
- Tracking: URL shorteners often provide analytics, allowing you to track clicks, geographic data, and referral sources.
Popular examples of URL shorteners include Bitly, TinyURL, and Google’s (now discontinued) URL shortener.
2. Planning Your URL Shortener
Before writing any code, it’s crucial to plan your project thoroughly:
Features: Determine the features you want to include. Basic features are URL shortening and redirection, while advanced features might include:
- Custom short URLs
- Analytics and reporting
- URL expiration dates
- API access for programmatic URL shortening
Technology Stack: Choose the technologies you’ll use. Common choices include:
- Backend: Node.js, Python (with Flask or Django), Ruby on Rails, PHP
- Database: MySQL, PostgreSQL, MongoDB, Redis
- Frontend: HTML, CSS, JavaScript frameworks like React or Vue.js
- Hosting: Decide where you’ll host your application. Options include AWS, Heroku, DigitalOcean, and self-hosting on a VPS.
3. Setting Up Your Development Environment
Setting up your development environment involves several steps:
- Install Necessary Software: Depending on your chosen stack, install the required runtime environments and libraries. For instance, if you choose Python and Flask, you’ll need Python installed along with Flask and a database like SQLite or PostgreSQL.
- Code Editor: Use a code editor or IDE that suits your workflow. Popular choices include Visual Studio Code, Sublime Text, and PyCharm.
- Version Control: Set up version control with Git. Create a repository on GitHub, GitLab, or Bitbucket to manage your codebase.
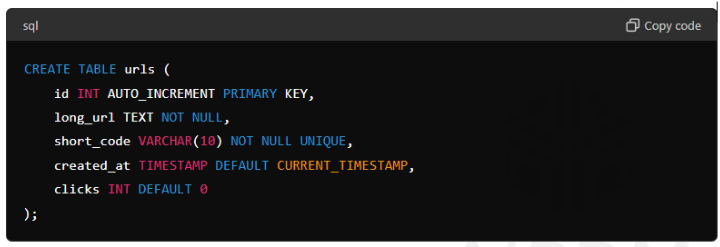
4. Designing the Database
The database design is critical for the functionality of your URL shortener. A simple design might include a single table with the following fields:
- id: A unique identifier for each record.
- long_url: The original long URL.
- short_code: The generated short code.
- created_at: Timestamp of when the URL was shortened.
- clicks: Counter for the number of times the short URL has been accessed.
For example, in SQL:
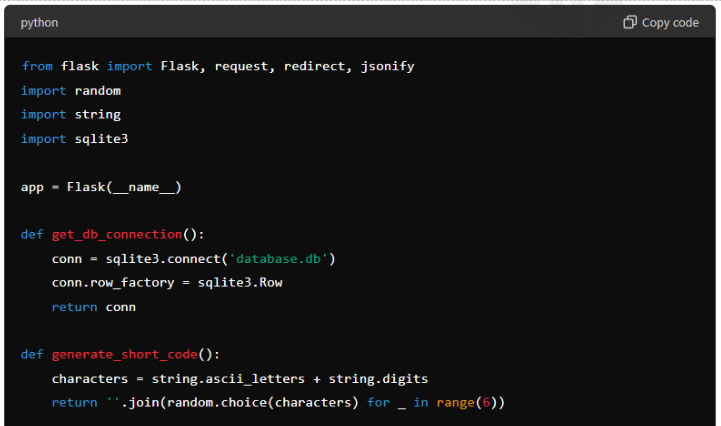
5. Implementing URL Shortening Logic
The core of your URL shortener is the logic to generate short codes and store URLs. Here’s a simple example using Python and Flask:

Step 2: Create the Flask App
First, create a new directory for your project and navigate into it. Then, create a file named app.py:
Step 3: Create the Database
Before running the app, you need to create the database. Create a script named init_db.py:
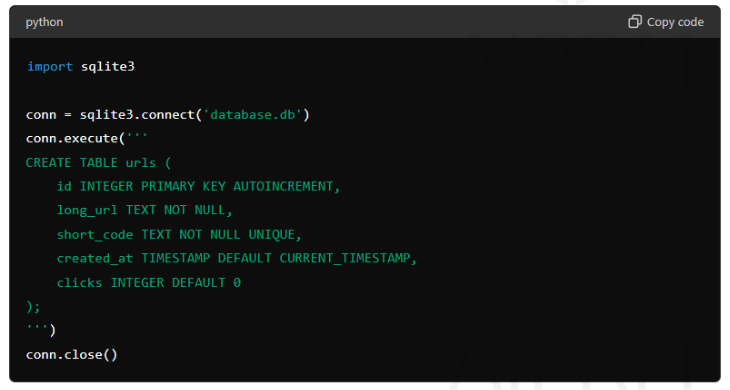
Run this script to initialize the database:

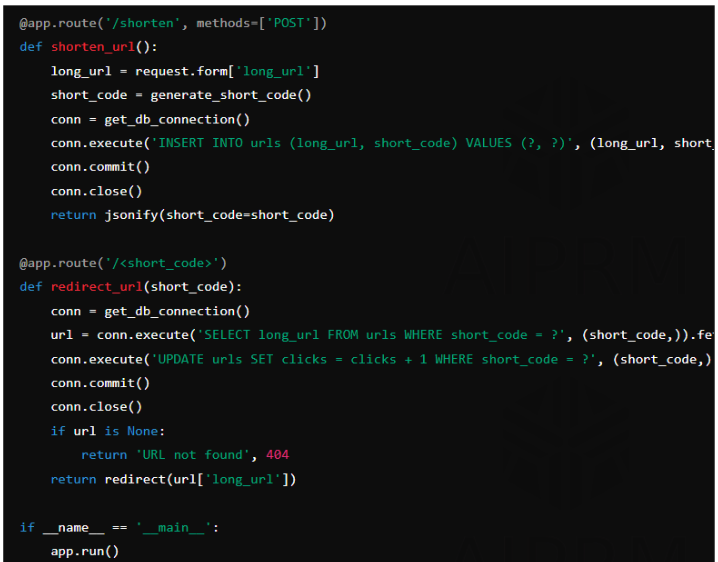
Step 4: Run the Flask App
Now, you can run your Flask application:

You should see output indicating that the app is running on http://127.0.0.1:5000/. You can now test your URL shortener by sending POST requests to http://127.0.0.1:5000/shorten with a long_url parameter and visiting the generated short URLs.
6. Handling Edge Cases and Security
When building your URL shortener, consider edge cases and security measures:
- Validation: Ensure the long URL is valid before storing it. You can use regular expressions or libraries to validate URLs.
- Short Code Uniqueness: Ensure generated short codes are unique to avoid conflicts. You might need to check the database to ensure the short code doesn’t already exist and generate a new one if it does.
- Rate Limiting: Implement rate limiting to prevent abuse and ensure your service remains performant. Libraries like Flask-Limiter can help with this.
- HTTPS: Use HTTPS to secure data transmission and protect users’ data.
7. Adding Advanced Features
To make your URL shortener more robust and competitive, consider adding advanced features:
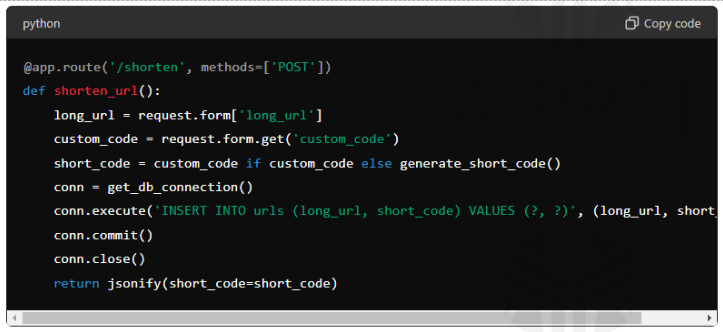
Custom Short URLs
Allow users to choose custom short codes instead of randomly generated ones. Update your shorten_url function to accept a custom short code:
Analytics
Track and display click statistics for each short URL. You can enhance the database to store more detailed analytics, such as geographic data or referrers.
Expiration
Allow URLs to expire after a certain period or number of clicks. Add fields to your database to store expiration information and update the redirection logic to check for expiration before redirecting.
API Access
Provide an API for programmatic access to your URL shortener. This can be useful for developers who want to integrate your service into their applications. Create routes for API endpoints and document them using tools like Swagger.
8. Deploying Your URL Shortener
Once your URL shortener is ready, deploy it to a hosting provider:
Choose a Hosting Provider
Popular options include AWS, Heroku, DigitalOcean, and others. Each has its own setup process, but most involve pushing your code to a remote repository and configuring the server to run your application.
Set Up a Domain
Purchase a domain name and configure it to point to your server. You’ll need to update your DNS settings to point to your hosting provider’s IP address.
Configure SSL
Use Let’s Encrypt or another SSL provider to secure your domain with HTTPS. This step is crucial for protecting user data and ensuring secure communication.
Deploy Your Application
Use Git to push your code to your hosting provider. Configure your server to run your application, set up environment variables, and ensure your database is properly configured.
9. Promoting and Maintaining Your URL Shortener
After deployment, promote your URL shortener and ensure it runs smoothly:
Marketing
Use social media, SEO, and other marketing strategies to attract users. Write blog posts, engage with communities, and use advertisements to reach a wider audience.
Monitoring
Set up monitoring tools to track server performance and uptime. Tools like New Relic, Datadog, and UptimeRobot can help you monitor your application and receive alerts if something goes wrong.
Maintenance
Regularly update your code and dependencies to ensure security and stability. Keep an eye on user feedback and be ready to fix bugs and add new features as needed.
Building a URL shortener involves various steps, from understanding the concept to planning, coding, deploying, and maintaining the service. By following this guide, you can create a functional and competitive URL shortener tailored to your needs. The journey involves both technical challenges and creative problem-solving, but with determination and careful planning, you can successfully build and launch your own URL shortener.